Linux / VPS Wallet 1.2.4 Setup & Staking Guide
ColossusXT Linux / VPS Wallet 1.2.4 Setup Guide
Security Advisory
Please use common sense and security best practices when working with other people to help configure and troubleshoot your wallet!
Scammers often pose as team members or "tech support". All official ColossusXT team members have custom colored names in the ColossusXT Discord.
Never share your keys, passwords, or wallet files with anyone. Never install third-party software or allow people to remotely control or view your system.
Remember, where there is money there are thieves!
Before we begin, if you’re new to Linux, it’s recommended that you become familiar with the basic commands. Here is a good cheat sheet to get you started.
First, a few quick bits of information you’ll need for this guide:
- All Linux commands are CASE SENSITIVE. ALWAYS pay close attention to case.
- The
~symbol is a shortcut to the current user’s home folder, which is/rootfor therootlogin, and/home/usernamefor any other user’s login. You will see this very often. It is not a random squiggly mark; it has a specific and important meaning. - Just like on Windows and OSX, the Linux COLX program folder (
~/colx-1.2.4) will be different than the COLX wallet folder (~/.ColossusXT). The program folder contains the executable application files, while the wallet folder contains yourwallet.datfile and your local copy of the COLX blockchain database.
Note: This guide is for a NEW install only! If you are updating from a previous version, please use the Linux / VPS Update Guide instead. It will be much quicker!
Connecting To Linux / VPS
Most VPS services come with a web-based console that lets you connect to your VPS without installing any additional software. However, many users prefer to install third-party software to connect to their VPS remotely.
For Windows, the most common Windows software to connect to a VPS is PuTTY. It is available for download here. Download and run the MSI installer, then run the PuTTY application. Enter the IP of your VPS, select port 22 and SSH, and click Open. You can also optionally click Save on this screen so that your Putty application will automatically open with these settings in the future.
The first time you connect with Putty, you will receive a Security Alert. Click Yes to this alert to continue to a login prompt.
Enter the your login credentials to log in. No characters will be displayed while you enter your password.
PuTTY Usage Note: To copy-paste into the PuTTY window, copy the text you wish to paste, then right-click in the PuTTY window. The text will be pasted at the location of your text cursor.
For OSX, a Terminal application is already built in and there is no need to install additional software like PuTTY. On OSX, Search for the “Terminal” application in Spotlight search or your applications menu. Use the ssh command along with your username and IP address to log in to your system:
You will see a similar one-time security warning. Type “yes” to continue:
For Linux, use the above ssh command to connect from your Linux terminal
Linux / VPS Password Security
Use a long, strong, and unique password. Your password should be at least 20 characters. Your password should not be in any dictionary. It should contain uppercase and lowercase letters, numbers, special characters, etc. Don't use obvious substitutions like 0 for O or 5 for S. Don't use a password that you use anywhere else, or even a password similar to one you use elsewhere.
To change your password, use the passwd command after logging in.
Linux / VPS Additional Security Options
Because Linux / VPS systems are generally always online, some users opt to take additional security precautions to protect their system from attacks and intrusion. If you're using your Linux wallet to hold and stake coins, here are some optional security steps you can consider taking to improve the security of your wallet:
Disable root Login: Some users choose to disable SSH login for the default root account, and create a new account for SSH access. Here is a good guide on setting this up.
If you disable root login, you will need to become familiar with the sudo command, which allows you to run commands as root while logged in as another user. You will need to use this for any command that affects the system as a whole and requires root access. For example, when logged in as newuser, you won't need to use sudo to do things like change directories (cd), list files (ls), download files (wget), or launch ColossusXT apps (./colxd). However, to reboot (reboot) or change firewall settings (ufw), you'd need to use sudo reboot or sudo ufw.
This guide is written with the assumption that you are logged in as root.
Install a Firewall: A good option to protect your system from attacks including Denial of Service (DoS) is to install a firewall. The most common one for Linux is Uncomplicated Firewall, or ufw. In fact, depending on which Linux distribution you choose to use, this may already be installed. To check if ufw is installed, type ufw status at the command prompt. If it says "command not found", it's not installed yet.
If ufw isn't installed, use the command apt-get install ufw to install it. Remember, if you disabled root SSH login and are logged in as a different user, you'll need to include the sudo command (sudo apt-get install ufw).
Once ufw is installed, configure it with the following commands:
ufw allow 51572/tcp (to open the port used by your server wallet)ufw allow 51573/tcp (to open the RPC port used by your server wallet)ufw allow ssh (to allow SSH login and prevent locking yourself out!)ufw enable (to enable the firewall)
If you're having network connectivity issues and want to check if the firewall is the problem, you can use the command ufw disable to see if that fixes your problem.
For more information, a good starter guide to ufw can be found here.
Download The 1.2.4 ColossusXT Wallet Program From Github
Use the wget command to download the 1.2.4 wallet archive directly to your ~/Downloads directory.
NOTE: There are different wallet versions available for each system architecture. If you don’t know your architecture, use the arch command:
Use only the command that matches your system architecture:
x86_64
wget -P ~/Downloads https://github.com/ColossusCoinXT/ColossusCoinXT/releases/download/v1.2.4/colx-1.2.4-x86_64-linux-gnu.tar.gz
i686
wget -P ~/Downloads https://github.com/ColossusCoinXT/ColossusCoinXT/releases/download/v1.2.4/colx-1.2.4-i686-pc-linux-gnu.tar.gz
ARM
wget -P ~/Downloads https://github.com/ColossusCoinXT/ColossusCoinXT/releases/download/v1.2.4/colx-1.2.4-arm-linux-gnueabihf.tar.gz
Extract The New Wallet Archive To Your Home Folder
Now use the tar command to extract the archive to a new COLX folder located at /user/home/colx-1.2.4. Again, use only the command that matches your system architecture:
x86_64tar xvzf ~/Downloads/colx-1.2.4-x86_64-linux-gnu.tar.gz -C ~
i686tar xvzf ~/Downloads/colx-1.2.4-i686-pc-linux-gnu.tar.gz -C ~
ARMtar xvzf ~/Downloads/colx-1.2.4-arm-linux-gnueabihf.tar.gz -C ~
NOTE: If you download and install the wallet for the wrong architecture, you will see an error like this when you attempt to launch the wallet:
Edit the ColossusXT.conf
Note: Older versions of the ColossusXT wallet required additional configuration for seed nodes, staking settings, etc. These have all been set as defaults and are no longer necessary.
The only thing that needs to be added to the ColossusXT.conf file is daemon=1. The daemon setting tells the system to start ColossusXT as a background process and return you to the command prompt. If you don’t use the --daemon switch when launching ./colxd and don’t have daemon=1 in your ColossusXT.conf, you will not be returned to the command prompt until you stop the ColossusXT server process by pressing [CTRL]+Z.
There are many text-based text editors for Linux. In this example we’ll use pico. Use this CASE-SENSITIVE command to open your ColossusXT.conf file in the pico editor:
pico ~/.ColossusXT/ColossusXT.conf
This will open your config file in the text editor. Add the following line of text:
daemon=1
When you are done, press [CTRL]+X to exit.
Press Y at the “Save modified buffer?” prompt:
Then press [Enter] to retain the original filename and exit:
The file will be saved, the editor will exit, and you will be returned to the command prompt.
Launch The COLX Wallet Application
Use the cd command to navigate to your new ColossusXT program folder and launch the ColossusXT wallet application:
cd ~/colx-1.2.4/bin
./colxd
The console should now indicate that the server is starting:

Now check the wallet status :
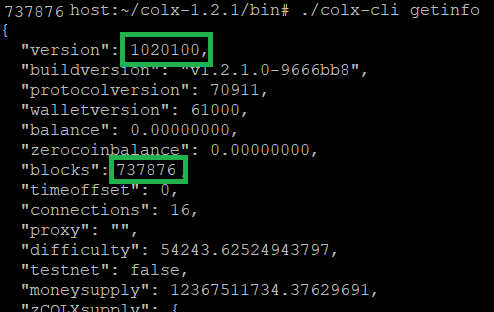
./colx-cli getinfo

Check the first line for a version number of 1020400 to verify that you’re now using the 1.2.4 wallet.
Your new wallet will now begin to download the COLX blockchain. If you wait a few seconds and repeat the getinfo command, you should see that the number of blocks has increased. You can monitor this number to track your process as the block number increases toward the current block number which can be found at the COLX Blockchain Explorer.
Additional Commands For Staking
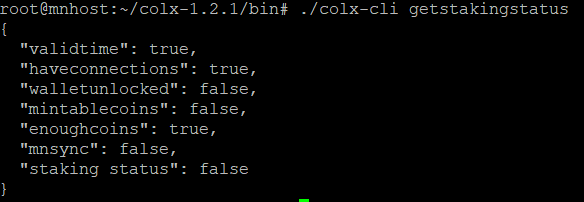
The colx-cli command is the command line version of the debug console built into the Windows and OSX wallets. Any command you’re familiar with in the GUI debug console will also work here. For example, you can use the getstakingstatus command:
./colx-cli getstakingstatus

In this case, staking status is false because there are no mature coins available, the wallet is not yet synchronized, and the wallet is not unlocked for staking.
Before you can stake, you’ll need to encrypt your wallet with the following command:
./colx-cli encryptwallet "password"

After encrypting, the wallet application will close. You’ll need to restart it:
./colxd
Just like on Windows and OSX, the wallet application always launches with the wallet locked, so you’ll need to unlock it before you can stake:
./colx-cli walletpassphrase "password" 0 true
Backing Up Your New Wallet
After you encrypt your wallet, a new kepool is generated, so you should back it up before sending COLX to any new addresses. The easiest way to back up your wallet.dat from a remote Linux / VPS system is via a secure FTP program such as WinSCP. Install WinSCP from the link provided, then connect using your IP address, login and password. Click “Yes” on the one-time warning to accept the server’s host key.
Once connected, you will need to press [CTRL]+[ALT]+H to enable viewing hidden files. Navigate to your remote ColossusXT directory (~/.ColossusXT) and drag the wallet.dat to your desired destination on your local file system.
Additional Wallet Commands
The following commands are good to know for standard use of the ColossusXT wallet.
./colx-cli getnewaddress “Your New Address Name” to generate a new COLX address in this wallet../colx-cli sendtoaddress “address” amountto send COLX from your wallet to another address../colx-cli help to display a complete list of commands. ./colx-cli help | more to get a complete list of commands and view it one page at a time.
Desktop Linux
If you’re using a graphical desktop version of Linux, you can also use the Linux GUI-based COLX wallet application. Be sure to stop your text-based wallet application first:
./colx-cli stop
Then start the GUI-based wallet by typing:
./colx-qt
Additional Resources
As always, if you have any questions, please come find us in the #general-support channel of the ColossusXT discord: