Masternode Setup Guide
Security Advisory
Please use common sense and security best practices when working with other people to help configure and troubleshoot your wallet!
Scammers often pose as team members or "tech support". All official ColossusXT team members have custom colored names in the ColossusXT Discord.
Never share your keys, passwords, or wallet files with anyone. Never install third-party software or allow people to remotely control or view your system.
Remember, where there is money there are thieves!
Welcome to the ColossusXT project, and congrats on your decision to become part of the backbone of the ColossusXT currency!
This guide will help you set up your ColossusXT masternode (MN).
As you may know, the ColossusXT MN system involves two running wallets:
- The MN server wallet. In this guide, we will refer to this as the "server wallet". This wallet is the MN’s brain, which processes ColossusXT transactions, verifies new blocks as they are created, and distributes blocks to ColossusXT users. This wallet is a server only, and holds no ColossusXT coins.
- The local control wallet. We will refer to this as the "local wallet". The local wallet holds the 10,000,000 ColossusXT MN collateral transaction, receives MN rewards, and is used to start and stop the MN server wallet.
The most common setup for these two wallets is the local wallet installed on the MN holder’s own local Windows or OSX machine, and the MN server wallet installed on a remote Linux VPS (Virtual Private Server) using a service such as VULTR or DigitalOcean. This guide will be geared toward such a setup.
While this is the most common and convenient setup, a VPS is not required. All that is needed are two systems, capable of running a current version of the ColossusXT wallet. The local and server wallets can be Windows, OSX, or Linux, and can run on any hardware that can host these operating systems, including desktops, laptops, a Raspberry Pi, embedded Linux systems, hacked refrigerators, etc. The system requirements are very low: generally speaking, if a system can run the host operating system, it can run the corresponding ColossusXT wallet.
Before you can begin setting up your MN, the local wallet and server wallet must both be installed and synchronized. There is ample documentation on this topic, so it won’t be repeated here.
The 1.2.3 ColossusXT setup guide for Windows and OSX can be located here.
The 1.2.3 ColossusXT setup guide for Linux / VPS systems can be located here.
Once your local wallet and server wallet are installed and synchronized, you are ready to begin.
Linux / VPS System Requirements
While pretty much any Windows or OSX machine can easily run the ColossusXT wallet application, subscription-based Linux VPS services often come with a barebones configuration, and charge more for additional resources. When selecting and configuring your Linux / VPS server, we recommend the following as the minimum system requirements:
- 1 CPU core (Additional CPUs / cores will not benefit your masternode)
- At least 10GB free disk space
- 2GB or more of RAM (or equivalent swapfile configured)
Linux / VPS Password Security
Use a long, strong, and unique password. Your password should be at least 20 characters. Your password should not be in any dictionary. It should contain uppercase and lowercase letters, numbers, special characters, etc. Don't use obvious substitutions like 0 for O or 5 for S. Don't use a password that you use anywhere else, or even a password similar to one you use elsewhere.
To change your password, use the passwd command after logging in.
Linux / VPS Additional Security Options
Because ColossusXT MNs are always online, with their IP easily discoverable from the ColossusXT wallet, some users wish to take additional security precautions to protect their system.
First, let's understand the security risks: Because your MN server wallet contains no coins at any point, the risks are surprisingly minimal. There are no coins to steal! If someone gained complete control of your MN server wallet, there are really only two things they could do to impact you: Take your masternode offline, or change your MN privkey, then restart your MN from another local wallet and begin to collect your MN rewards. In either case, you would notice this quickly and could take simple steps to fix the situation. Your local wallet and 10M COLX are NEVER in jeopardy.
Here are two optional security steps you can consider to increase your server's system security:
Disable root Login: Some users opt to disable SSH login for the default root account, and create a new user account for SSH access. Here is a good guide on setting this up.
If your wallet is already installed under the root account, be sure to stop the server using the ./colx-cli stop command while logged in as root before you disable the account. You'll also need to move your ColossusXT wallet and application files from the /root/ folder into your new user directory.
For example, if you installed your ColossusXT wallet as root, and then created a new user namednewuser, you can move your ColossusXT folders using these commands:
sudo mv /root/.ColossusXT /home/newuser/.ColossusXT
sudo mv /root/colx-1.2.3 /home/newuser/colx-1.2.3
Note the sudo command above. If you disable root login, you will need to become familiar with this command, which allows you to run commands as root. For example, when logged in as newuser, you won't be able to reboot the system without using the sudo command sudo reboot.
Install a Firewall: A good option to protect your system from attacks including Denial of Service (DoS) is to install a firewall. The most common one for Linux is Uncomplicated Firewall, or ufw. In fact, depending on which Linux distribution you choose to use, this may already be installed.
To check if ufw is installed, type ufw status at the command prompt. If it says "command not found", it's not installed yet. If ufw isn't installed, use the command apt-get install ufw to install it. And remember, if you disabled root SSH login and are logged in as a different user, you'll need to include the sudo command (sudo apt-get install ufw).
Once ufw is installed, configure it with the following commands:
ufw allow 51572/tcp (to open the port used by your server wallet)ufw allow 51573/tcp (to open the RPC port used by your server wallet)ufw allow ssh (to allow ssh and prevent locking yourself out!)ufw enable (to enable the firewall)
If you're having network connectivity issues and want to check if the firewall is the problem, you can use the command ufw disable to see if that fixes your problem.
For more firewall information, a good ufw starter guide can be found here.
Now that we're comfortable with the security of our server, we can being setting up the masternode.
Memory / Swapfile Configuration
A ColossusXT masternode requires a minimum of 2GB of RAM to operate. However, most VPS providers offer a base configuration of 1GB or less, and charge an added premium for additional RAM. To avoid this extra cost, you can configure a swapfile to simulate the required 2GB of RAM.
To view your available RAM, use the free command:

Memory is displayed in KB. This system has 1,031,700 KB, or 1GB, of physical RAM installed, and needs additional RAM before it can be used as a masternode.
To configure a swap file, enter the following commands:
fallocate -l 4000M /swapfiledd if=/dev/zero of=/swapfile bs=1M count=4000mkswap /swapfilechmod 600 /swapfileswapon /swapfileecho '/swapfile none swap sw 0 0' >> /etc/fstab
NOTE: If you disabled root as described earlier, and are logged in under a different account, you will need to preceed each command with the sudo command.
Now run the free command again. The new 4GB swap file should now be active and displayed in the Swap section at the bottom:

Create The 10M MN Collateral Transaction
To run a ColossusXT MN, the local wallet needs to contain an address with exactly 10M COLX sent in a single transaction. When purchasing COLX for your MN, keep in mind that you’ll likely need to pay some transaction fees to get the coins off an exchange, into your wallet, and sent in a single 10M transaction, so remember to pad your 10M COLX investment with some extra COLX to cover these transaction costs if needed.
First, we need to create a receive address for the 10M transaction. In your local wallet, click on the Receive tab. Enter a new label for this address, such as "Masternode Transaction", then click "Request Payment".

NOTE: This guide was created using a wallet on the ColossusXT Testnet. In the screenshots, instead of "COLX", you will see references to "tCOLX", which is our fake Testnet currency.
Once the payment address is created, send EXACTLY 10M COLX to this address. Remember, whether you are sending to yourself from within the ColossusXT wallet, or sending from an exchange, the amount received needs to be exactly 10,000,000 COLX. Be sure to account for transaction fees, exchange fees, and withdrawal fees when creating this transaction.
For example, a local transaction sent to yourself will automatically add the transaction fee. Make sure you have enough additional COLX to cover this fee.

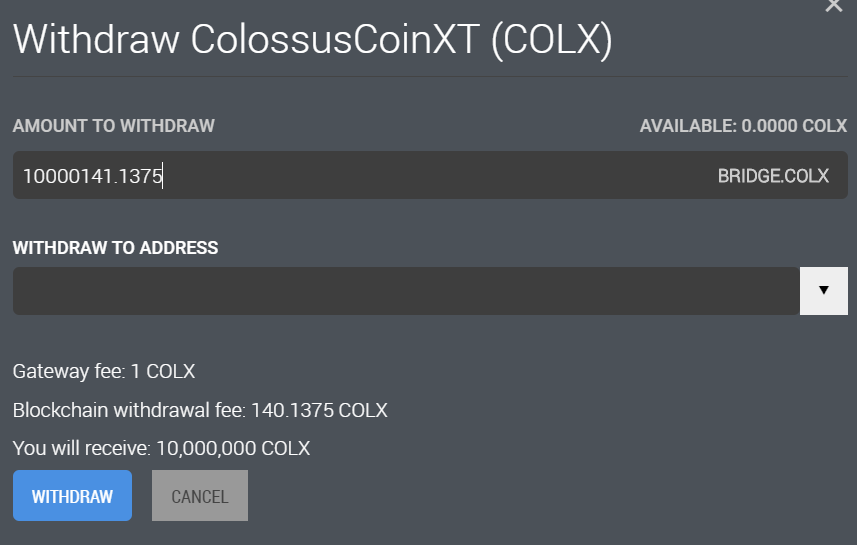
A transaction from an exchange will add its own fees also. For example, on Crypto-Bridge, you would actually need to withdraw 10,000,141.1375 to cover their Gateway fee and blockchain withdrawal fee and receive 10,000,000 COLX.
Once you receive your 10M COLX, open the wallet debug console, type masternode outputs, and press [Enter]. This will give you your MN txhash, and your outputidx.

Save both of these pieces of information to a text file; you will need them later.
Create A MN Privkey
In the local wallet debug console, type masternode genkey and press [Enter]. This will general a new privkey (private key) for your masternode.

Save this along with your txhash and outputidx from the previous step.
Edit The Local Wallet masternode.conf
In on your local wallet system, open your masternode.conf file.
In Windows, you can press [Windows]+R, type %appdata%\ColossusXT, click OK and open the file from there. If prompted for a program to use to edit the file, select Notepad.
In OSX, you can press [Command]+[Shift]+G, enter ~/Library/Application Support/ColossusXT/ (Note: case sensitive!), click Go, and open the file from there. If prompted for a program to use to edit the file, select TextEdit.
On a new line below the included examples that begin with the # symbol, add a line of text in the following format:
name ip:port privkey txhash outputidxname: Create a name for your new masternode, such as “COLXMN” or “MN01”.ip: The external ip address of your server wallet system.port: Use 51572, the default ColossusXT communicate port.privkey: Use the privkey generated in the last step.txhash: Use the txhash generated from the masternode outputs command.outputidx: Use the outputidx generated from the masternode outputs command (it will be a 1 or a 0).
This will result in a very long string that looks like this:

Save and close the local masternode.conf file, then close and restart your local ColossusXT wallet application.
Edit The Server wallet ColossusXT.conf
Because most server wallets are running on a Linux-based VPS, we will use a Linux text-based text editor to edit the server wallet ColossusXT.conf.
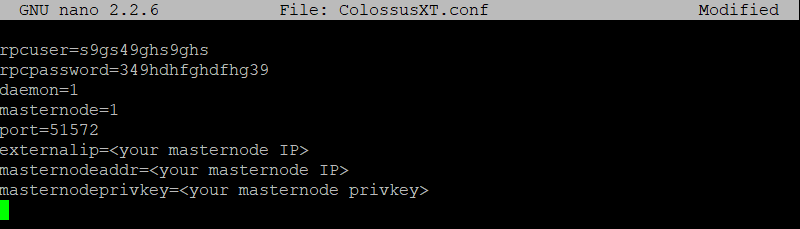
Log in to your VPS. Open the server wallet ColossusXT file in the pico editor by typing pico ~/.ColossusXT/ColossusXT.conf (NOTE: This command is CASE SENSITIVE).
Add the following lines of text to the server wallet ColossusXT file. NOTE: If you are using PuTTY to connect to your VPS, you can right-click to paste, and avoid having to type out the long MN private key.
rpcuser=s9gs49ghs9ghs
rpcpassword=349hdhfghdfhg39
daemon=1
masternode=1
port=51572
externalip=<your masternode IP>
masternodeaddr=<your masternode IP>
masternodeprivkey=<your masternode privkey>
For rpcuser and rpcpassword, enter your own random characters.
Replace <your masternode ip> with the IP address of your server wallet. Do not include the <> brackets.
Replace <your masternode privkey> with the privkey created in the previous steps. Do not include the <> brackets.
Once everything is entered and correctly changed to your own MN details, press [CTRL]+X to exit. PressY to save, and [ENTER] to retain the original filename.
Restart The Server Wallet
Navigate to the location of the server wallet executables. If you installed your server wallet to the default location (as instructed in the ColossusXT Linux / VPS Wallet 1.2.3 Setup Guide), use the command cd ~/colx-1.2.3/bin to change to that directory. If you installed to a different location, use that path instead. Verify that you are in the correct folder by typing ls to list the files in that directory. You should see your ColossusXT executables listed:

Now type ./colx-cli stop to stop the server wallet. Once that completes, type ./colxd to start it up again.

Start The Masternode From The Local Wallet
Everything is now in place to start your MN from your local wallet.
Open the local wallet, click the Masternodes tab. Select your MN so that it is highlighted in green. Click Start Alias, then click OK when prompted for confirmation:

Once the MN starts, you will see this success message on your local wallet:

If you receive an error about "unavailable txid", open the local wallet debug console and use the command startmasternode alias true "COLXMN" to start your MN manually. (Substitute your own MN name.)
Once your MN has started, you can use the command ./colx-cli masternode status on your masternode server wallet to confirm the status of your masternode:

It can sometimes take a few hours before a masternode is reported as being online. If you get an error, be patient and keep trying every 15 minutes or so.
Once you get the above confirmation, you're done! Your masternode is now up and running, and you should begin to receive masternode rewards within the next 5-7 hours.
Viewing Masternode Rewards
Once you begin to receive MN Rewards, they will be visible as "Masternode Reward" transactions on the Transactions tab of your local wallet:

Spending Masternode Rewards
New MN holders often worry about accidentally spending COLX from their 10M COLX collateral transaction and inadvertently taking their MN offline. However, this is not possible: Once your txhash is added to your local wallet masternode.conf file, the 10M collateral transaction become unavailable for spending, and cannot be used until the masternode is removed. This will prevent you from accidentally breaking your masternode. You will see a gray lock icon next to this transaction in your payment inputs window:

Additional Resources
If you have any additional questions or run into issues, or would like to suggest changes or additions to this guide, please join us in the #masternode-support channel on our Discord: